The new kid in town in Python land is pipx. With pipx, you install and run Python applications in a convenient way. Under the hood, it automatically creates a virtual environment for the Python application and adds the executable, to a location on your user’s PATH. You can think of pipx as Flatpak, but then dedicated to install and run Python applications. This hands-on article teaches you all you need to know about how to install Python applications with pipx.
Background
The relatively new pipx tool makes it convenient to install Python applications on your Linux system. But wait..didn’t we already have the pip tool for that? True, but pip comes with a few drawbacks:
- It installs Python applications in your user’s (or system’s) Python environment. This can lead to version clashes, specifically if multiple Python applications require the same package, but with different versions.
- You can install Python applications with
pipin a Python virtual environment, to bypass the version class issues. But then you need to explicitly activate the virtual environment, before you can run the application.
Using pipx instead of pip to install Python applications, solves both these drawbacks. When installing a Python application with pipx, it automatically:
- Creates a new Python virtual environment for the application.
- Installs the Python application into this virtual environment.
- Adds the application’s executable to a location on your user’s PATH.
This essentially creates an isolated sandbox environment for the installed Python application. While at the same time making it convenient to use, because you can run the application right away. From a concept perspective, you can think of pipx as Flatpak for Python applications.
Do we still need pip then? Absolutely. Especially when developing Python applications, because you typically do so in a Python virtual environment. In this case, use pip for installing the packages that your application requires. So basically:
- Use
pipxwhen installing Python applications on your system, for example from the Python Package Index (PyPI). - While developing Python applications, use
pipto install its required packages.
This article explains in a hands-on way, how you install Python applications with pipx.
What do you need
The pipx tool works on macOS, Linux and Windows. Since this blog targets a Linux audience, this article focuses on using pipx on Linux. As such, you just need a Linux system. Ideally, one that comes with Python 3.7 or higher. If you do not yet have access to a Linux system, consider quickly setting up Ubuntu at a virtual machine:
For this article, I’ll decided on using a Debian 11 “bullseye” virtual machine. That’s what you’ll see in the screenshots.
Besides a Linux system we’ll also need pipx on it. We’ll cover the installation of pipx in the next section.
Install pipx on your Linux system
In general, two methods exists to install pipx on your Linux system. Using your distribution’s package manager or directly from PyPI with pip. My personal preference always goes towards using the distribution’s package manager. That way you automatically receive security fixes, each time you update your system.
Add directory ~/.local/bin to your PATH
After installing a Python application with pipx, you can run the application from directory ~/.local/bin. By adding this directory to your PATH variable, you can start the application, simply by typing its name, as opposed to including its full directory.
To add the ~/.local/bin directory to your PATH variable, edit your .bashrc file, for example with the Nano editor:
nano .bashrc
Next, add the following line at the end of this file:
export PATH="$PATH:$HOME/.local/bin"
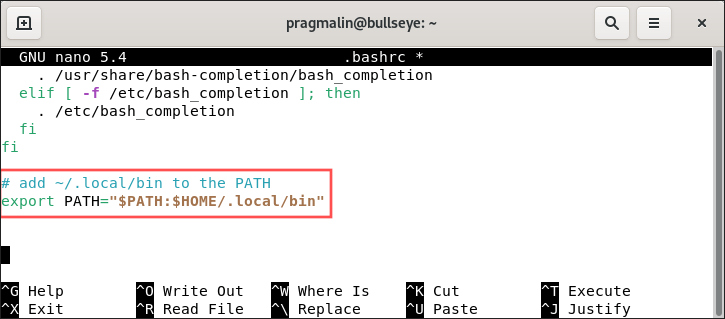
The new path activates after your close your terminal program and then reopen it.
Install pipx using your distribution’s package manager
The installation instructions for pipx on popular Linux distributions:
- Ubuntu / Debian:
sudo apt install pipx python3-venv- Available since Ubuntu 20.04 LTS.
- Planned for Debian 12 “bookworm”. On Debian 11 “bullseye”, you can install
pipxfrom the Backports repository.
- Fedora:
sudo dnf install pipx- Available since Fedora 34.
- openSUSE Tumbleweed / Leap:
sudo zypper install python3-pipx- Not available for Leap 15 yet. However, you can install from devel:languages:python:backports on OBS for Leap 15.4.
Install pipx using Python pip
As you could see in the above section, pipx is still fairly new. Consequently, your distribution’s package manager might not yet include it. In this case, you could opt to install pipx directly using pip. This assumes you already installed pip on your system. As an example, here’s how you would install pipx on Debian 11 “bullseye”, using Python pip:
- First install
pip:sudo apt install python3-pip python3-venv - Next install
pipxfrom PyPI for your user:pip install pipx
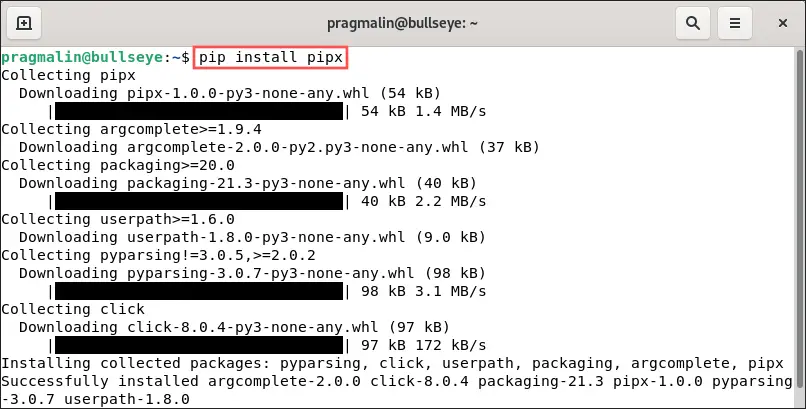
This makes the pipx executable available in directory ~/.local/bin/pipx. We recently added this directory to our user’s PATH variable. This means we can run pipx from the terminal by just typing the command pipx:

Install a Python application from PyPI with pipx
The previous section focused on getting pipx installed on our Linux system. About time to take it for a spin. If you want to install an application from PyPI, you typically first search for it on the PyPI website. Let’s take the qrcode application as an example. It generates QR code images. You find it here on the PyPI website:
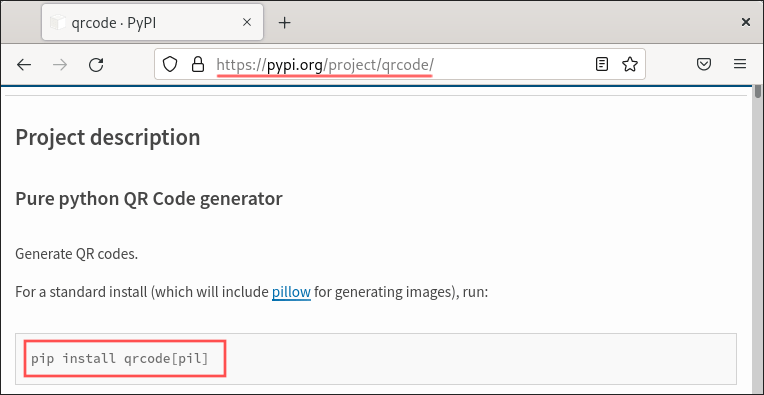
On the site you can read the instructions for installing the qrcode application with pip. But that’s not what we want. We prefer to take advantage of the benefits of pipx, which install the application in its own isolated environment. To do so, simple type pipx instead of pip to install the application. In our case:
pipx install qrcode[pil]

From now on, we can generate QR code images. For example:
qr "https://www.pragmaticlinux.com" > pl.png
Creates the following pl.png image file:

Some of you might wonder where pipx creates the isolated environments for the installed applications. You can find them in directory:
~/.local/pipx/venvs/
Add additional Python dependencies with pipx inject
Sometimes you would like to install additional Python packages inside the isolated environment, which pipx created for the Python application you installed. This is possible with the help of pipx inject. The MkDocs Python application serves as a good example.
With MkDocs you can convert documentation from Markdown files to a static website. I personally use this quite often to document software that I developed. If you host the source code and its Markdown documentation files on GitHub, you can even use GitHub Actions to automate the static website generation. This means that each time you push a commit to the GIT repository, the static website with documentation gets automatically generated and published as GitHub Pages. Anyways, I digress. I’ll probably cover this in more detail in a future article.
The default MkDocs theme works fine. However, I prefer the excellent Material for MkDocs theme. To use this theme, you would need to install it inside the isolated environment, which pipx created for the MkDocs application. Luckily, this is possible with the pipx inject feature. The following commands first install MkDocs and then inject the Material for MkDocs theme into its isolated environment:
pipx install mkdocspipx inject mkdocs mkdocs-material

List all pipx installed Python applications
After installing Python applications with pipx for a while, you might loose track of which ones you actually installed. Luckily, the pipx tool offers functionality to generate a list of Python applications it installed for you:
pipx list

It even shows you the version number of the installed Python application.
Upgrade a pipx installed Python application
Sometimes you want to reap the benefits of functionality added to a newer version of a Python application. With the help of pipx you can upgrade an installed Python application to its latest version:
pipx upgrade [APPLICATION]
If you want to also upgrade the Python packages that you injected into the isolated environment, you can add the --include-injected parameter. For example:
pipx upgrade --include-injected mkdocs

If you installed many applications with the help of pipx, it gets tedious to upgrade them one-at-a-time. Luckily you can also upgrade all installed Python applications with one command:
pipx upgrade-all
Remove a pipx installed Python application
While doing maintenance on your Linux system, you might realize that you installed one or more Python applications with pipx that you no longer need. To uninstall a Python application, including the removal of its isolated environment, run:
pipx uninstall [APPLICATION]
For example:
pipx uninstall qrcode

If for some reason you want to remove all Python applications that you installed with pipx, run:
pipx uninstall-all
Wrap up
The new pipx tool offers the perfect middle ground between installing Python applications in your system’s (or user’s) Python environment versus installing them in a manually created Python virtual environment.
This article covered:
- Installing the
pipxtool on your Linux system. - How to install and manage Python applications with
pipx.
I recommend you use pipx to install Python application anytime, expect when:
- Your Linux distribution’s package manager also offers the Python application. This way you receive security updates automatically.
- You actively develop the Python application. A dedicated Python virtual environment offers the better solution in this case.

