Do you manage a remote server with SSH and do you login with a username and password? Then it is about time that you switch to an alternative method: one where you identify yourself with an SSH key pair. This tutorial shows you how to generate and copy SSH key to server. Logging in by means of an SSH key pair increases security. At the same time it adds convenience for you, because it enables you to login without providing a password every time.
The instructions provided in this article are written for a Debian PC that connects to a Debian server with SSH. However, Debian is not a prerequisite because the commands are quite similar for other Linux distributions. Refer to this article for an example on how to setup a Debian based Linux server in VirtualBox.

Background info
After setting up a Linux server with SSH access, you typically login by providing a username and password. This works fine, but what about security? For an Internet facing server, it is only a matter of time before someone determines its IP address and figures out that the server accepts SSH connections. Those with ill intentions can then run an automated script for continuously trying to gain access via SSH. With each connection attempt, they try a different username and password, with the hope that they can login. Their ultimate goal is to take control of your server. As the administrator of the server, you want to prevent this nightmare scenario from happening at all cost.
One way of lowering the risk that this unwanted scenario happens is to generate and copy SSH key to server. Ideally you do this as soon as possible after setting up the server. Afterwards you can disable SSH logins with a username and password altogether. Note that this latter part will be covered in a future article.
What is an SSH key?
An SSH key essentially consists of two files that belong together. One is called the public key and the other one is called the private key. This key pair forms a unique combination, with its contents based on hard to crack cryptography. Thanks to these properties, it is highly unlikely that another key pair is alike, making it a perfect and secure option for SSH authentication purposes. Your server holds a copy of the public key and the private key should just be located on your PC. As its name implies, do not share the private key with anyone else.
Generate SSH key pair
As a first step we generate a new SSH key pair. You can perform this step on your own PC. On Linux, the ~/.ssh directory is designated for storing SSH keys. So let’s start by opening the terminal and going to this directory:
cd ~/.ssh
If you get an error stating that this directory does not exits, create it with:
mkidr ~/.ssh
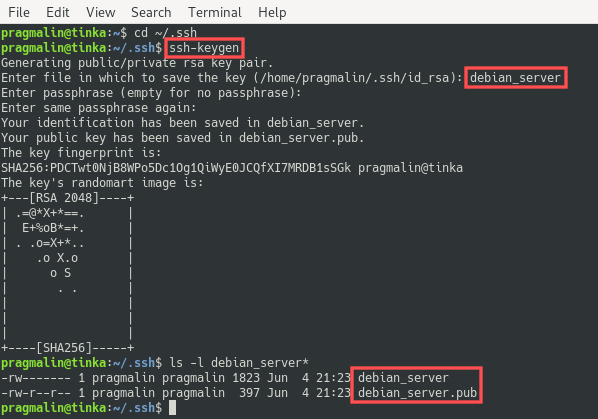
Now that you are in the correct directory, start the SSH key pair creation process by entering command:
ssh-keygen
The program prompts you to enter a file name for the key pair. In this example I specify debian_server as the name, but you can change this to whatever name you prefer. Next, the program prompts you for a passphrase. This is a text string of your choice that you would need to enter each time you use the key for authentication purposes. For convenience you can leave the passphrase empty by simple pressing Enter twice. You now have a brand spanking new SSH key pair. The private key file is called debian_server and the public key file is called debian_server.pub:

Note for Putty users
The generated private key file works fine with the OpenSSH tools that are available by default on all major Linux distributions. In case you also run Windows and want to connect to your server from that operating system, you probably use the program Putty to connect to your server via SSH. Unfortunately, Putty does not understand the format of the generated private key file. Instead, it expects a file with the .ppk extension. Luckily, tools are available to generate this .ppk version of the private key file.
Start of by installing the necessary packages. Under Debian run the command:
sudo apt install putty-tools
Next, open the Terminal in the ~/.ssh directory and enter this command for generating the debian_server.ppk private key file for Putty:
puttygen debian_server -o debian_server.ppk
Register the private SSH key
Under Debian and most other Linux distribution, an SSH authentication agent is running in the background. If you register your newly created private SSH key file with the authentication agent, you no longer have to specify the name and location of the private SSH key file each time you connect to your server via SSH. So this step is not absolutely necessary, but it makes you life as a server administration just one tiny step more convenient.
Before registering the private SSH key file, open the terminal and verify that the SSH authentication agent is actually running. Next, register it with the help of the ssh-add program:
eval "$(ssh-agent -s)"
ssh-add ~/.ssh/debian_server

This completes the setup of the private SSH key file on your own PC. Note that if you ever need to unregister the private SSH key file from the authentication agent, you can do so with the same command and specifying the -D option: ssh-add -D ~/.ssh/debian_server.
Copy SSH key to server
The final step in getting the SSH key pair all setup, consists of copying the public SSH key file to your server. So the server that is currently still accessible via SSH with a plain username and password. For example purposes, I demonstrate this step with the Debian server in VirtualBox that was created for a previous tutorial. Its hostname is debianvm and my username there is the same as on my PC: pragmalin.
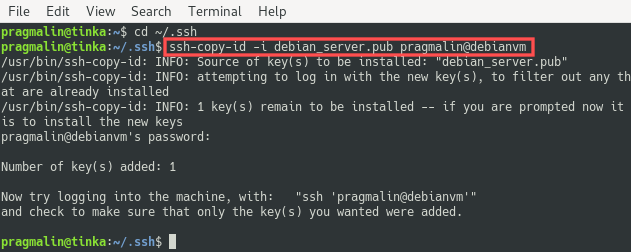
To copy the public SSH key file to your server, run this command, just replace the pragmalin username and the debianvm hostname with values that apply to your specific server:
ssh-copy-id -i debian_server.pub pragmalin@debianvm

This adds the public SSH key file to ~/.ssh/authorizedkeys on your server.
Authenticate with the SSH key
So far we generated a new SSH key pair, registered the private SSH key file with the SSH authentication agent running on your own PC and copied the public SSH key file to your server. The only thing left to do is to verify that we can now actually connect to the server with SSH and authenticate with the new SSH key pair.
You can run the usual command to connect to your server with SSH. So ssh <username>@ip-address or ssh <username>@hostname. After a successful setup of the SSH key pair, you’ll notice that you no longer get asked to enter your password:

This is the ultimate proof that your SSH authentication by means of the SSH key works. I hope you enjoyed working through this tutorial and I would like to leave you with two more notes:
(1) Make sure to never give your private SSH key to anyone else or store it in a public location. If they have your private SSH key, know the hostname of your server and your username on that server, they have access. If you are worried about this situation transpiring, enter a keyphrase while generating the SSH key pair. This adds an extra layer of security.
(2) You can reuse the SSH key pair for multiple servers. Simply copy the public SSH key file to all servers that you intend to administer with the same ssh-copy-id command, as explained in the previous section.


3 thoughts on “Generate and copy SSH key to server”
Comments are closed.